Wednesday, December 31, 2008

JFace AWT Selection Binding

Goal


The goal of this entry is to embed an AWT and Swing component in an Eclipse Editor and to bind the AWT selection change events to the Eclipse Selection Service.

Create a Swing Tree and Tree Model


Because we will be combining AWT components with an Eclipse Editor, we should first create a Plug-in project that will contribute to the UI. For this example, the project can be named timezra.blog.swt_awt_selection_binding.
For the Swing components, we will use the example from the Sun Tree Tutorial as a basis for our JTree and TreeModel.

The Model Object


package timezra.blog.swt_awt_selection_binding.awt;

public class BookInfo {
public final String bookName;
public final String bookURL;

public BookInfo(final String bookName, final String bookURL) {
this.bookName = bookName;
this.bookURL = bookURL;
}

@Override
public String toString() {
return bookName;
}
}


We can use a factory method to build the JTree and populate the backing TreeModel.


package timezra.blog.swt_awt_selection_binding.awt;

import javax.swing.JTree;
import javax.swing.tree.DefaultMutableTreeNode;
import javax.swing.tree.DefaultTreeModel;

public final class JTreeFactory {
private JTreeFactory() {
// singleton
};

public static JTree create() {
final DefaultMutableTreeNode top = new DefaultMutableTreeNode(
"The Java Series");
final DefaultMutableTreeNode category = new DefaultMutableTreeNode(
"Books for Java Programmers");
top.add(category);
category.add(new DefaultMutableTreeNode(new BookInfo(
"The Java Tutorial: A Short Course on the Basics",
"tutorial.html")));
category.add(new DefaultMutableTreeNode(new BookInfo(
"The Java Tutorial Continued: The Rest of the JDK",
"tutorialcont.html")));
category.add(new DefaultMutableTreeNode(new BookInfo(
"The JFC Swing Tutorial: A Guide to Constructing GUIs",
"swingtutorial.html")));
category.add(new DefaultMutableTreeNode(new BookInfo(
"Effective Java Programming Language Guide", "bloch.html")));
category.add(new DefaultMutableTreeNode(new BookInfo(
"The Java Programming Language", "arnold.html")));
category.add(new DefaultMutableTreeNode(new BookInfo(
"The Java Developers Almanac", "chan.html")));
return new JTree(new DefaultTreeModel(top));
}
}


Create an Eclipse Editor


We can create a very basic Eclipse Editor and contribute it through the plugin.xml. Here, the editor is opened for any file with the .book extension.
The Editor Extension

In order to bind the Swing component to the SWT Composite, we can use the SWT_AWT Bridge. We will wrap the JTree with an AWT Panel and place that Panel in the Frame returned by the SWT_AWT factory. Also, for this example, we will ensure that all the TreeNodes are expanded in the JTree.


package timezra.blog.swt_awt_selection_binding.editors;

import java.awt.Frame;
import java.awt.Panel;
import javax.swing.JTree;
import org.eclipse.core.runtime.IProgressMonitor;
import org.eclipse.swt.SWT;
import org.eclipse.swt.awt.SWT_AWT;
import org.eclipse.swt.widgets.Composite;
import org.eclipse.ui.IEditorInput;
import org.eclipse.ui.IEditorSite;
import org.eclipse.ui.PartInitException;
import org.eclipse.ui.part.EditorPart;
import timezra.blog.swt_awt_selection_binding.awt.JTreeFactory;

public class JTreeEditor extends EditorPart {

@Override
public void doSave(final IProgressMonitor monitor) {
// no-op
}

@Override
public void doSaveAs() {
// no-op
}

@Override
public void init(final IEditorSite site, final IEditorInput input)
throws PartInitException {
setSite(site);
setInput(input);
}

@Override
public boolean isDirty() {
return false;
}

@Override
public boolean isSaveAsAllowed() {
return false;
}

@Override
public void setFocus() {
// no-op
}

@Override
public void createPartControl(final Composite parent) {
final Panel panel = new Panel();
final JTree jTree = JTreeFactory.create();
panel.add(jTree);
for (int i = 0; i < jTree.getRowCount(); i++) {
jTree.expandRow(i);
}
final Composite container = new Composite(parent, SWT.EMBEDDED);
final Frame frame = SWT_AWT.new_Frame(container);
frame.add(panel);
}
}


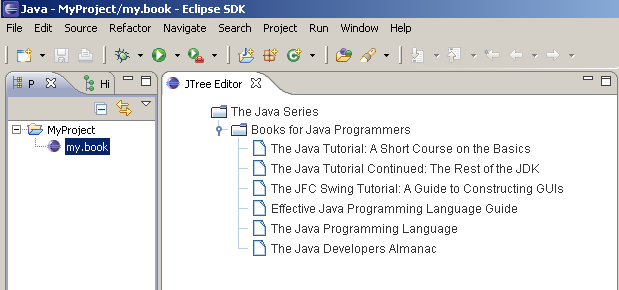
If we run with a new Eclipse launch configuration, create a default project and a stub .book file we will now see the Editor with the embedded AWT and Swing components.
The JTree embedded in an Eclipse Editor

Create a SelectionProvider


We are ready to create a JTreeSelectionProvider which listens for AWT selection events and broadcasts those events to the Eclipse Workbench. Note that the TreeSelectionAdapter is responsible for ensuring that SelectionChangedEvents are dispatched on the SWT Display thread; otherwise, the events will be dispatched on the AWT Event Thread.


package timezra.blog.swt_awt_selection_binding.editors;

import java.util.ArrayList;
import java.util.HashMap;
import java.util.List;
import java.util.Map;
import javax.swing.JTree;
import javax.swing.event.TreeSelectionEvent;
import javax.swing.event.TreeSelectionListener;
import javax.swing.tree.DefaultMutableTreeNode;
import javax.swing.tree.TreePath;
import org.eclipse.jface.viewers.ISelection;
import org.eclipse.jface.viewers.ISelectionChangedListener;
import org.eclipse.jface.viewers.ISelectionProvider;
import org.eclipse.jface.viewers.SelectionChangedEvent;
import org.eclipse.jface.viewers.StructuredSelection;
import org.eclipse.swt.widgets.Display;

class JTreeSelectionProvider implements ISelectionProvider {

private final Map<ISelectionChangedListener, TreeSelectionListener> swt2Swing;
private final JTree tree;

JTreeSelectionProvider(final JTree tree) {
this.tree = tree;
swt2Swing = new HashMap<ISelectionChangedListener, TreeSelectionListener>();
}

public void addSelectionChangedListener(
final ISelectionChangedListener listener) {
final TreeSelectionAdapter adapter = new TreeSelectionAdapter(listener);
swt2Swing.put(listener, adapter);
tree.addTreeSelectionListener(adapter);
}

public void removeSelectionChangedListener(
final ISelectionChangedListener listener) {
tree.removeTreeSelectionListener(swt2Swing.get(listener));
}

public ISelection getSelection() {
final TreePath[] paths = tree.getSelectionPaths();
if (paths == null) {
return StructuredSelection.EMPTY;
}
final List<Object> selections = new ArrayList<Object>();
for (final TreePath path : paths) {
selections.add(((DefaultMutableTreeNode) path.getLastPathComponent())
.getUserObject());
}
return new StructuredSelection(selections);
}

public void setSelection(final ISelection selection) {
// not yet implemented
}

private final class TreeSelectionAdapter implements TreeSelectionListener {

private final ISelectionChangedListener listener;

TreeSelectionAdapter(final ISelectionChangedListener listener) {
this.listener = listener;
}

public void valueChanged(final TreeSelectionEvent e) {
Display.getDefault().asyncExec(new Runnable() {
@Override
public void run() {
listener.selectionChanged(new SelectionChangedEvent(
JTreeSelectionProvider.this, getSelection()));
}
});
}
}
}


We may then register this ISelectionProvider with our Eclipse Editor Site.


public class JTreeEditor extends EditorPart {
....
public void createPartControl(final Composite parent) {
....
getSite().setSelectionProvider(new JTreeSelectionProvider(jTree));
}
....
}


Create a Command


To test whether the provider properly propagates selection events, we can create a new Command. For our test, the command should only be enabled if a single BookInfo is selected. All the command contribution and enablement information can be configured through extension points.
Here, the command handler is enabled when exactly one instance of BookInfo is selected.
The Command Contribution and Enablement Configuration.

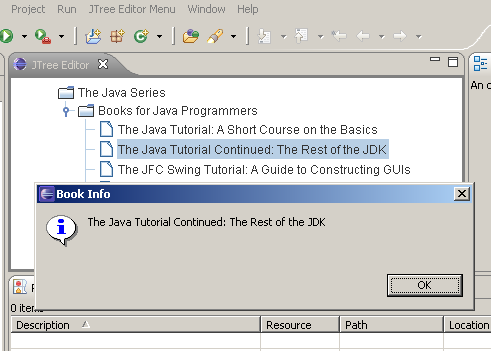
The command handler implementation displays the Book information in a message dialog.


package timezra.blog.swt_awt_selection_binding.handlers;

import org.eclipse.core.commands.AbstractHandler;
import org.eclipse.core.commands.ExecutionEvent;
import org.eclipse.core.commands.ExecutionException;
import org.eclipse.jface.dialogs.MessageDialog;
import org.eclipse.jface.viewers.IStructuredSelection;
import org.eclipse.ui.IWorkbenchWindow;
import org.eclipse.ui.handlers.HandlerUtil;
import timezra.blog.swt_awt_selection_binding.awt.BookInfo;

public class BookInfoSelectionHandler extends AbstractHandler {
public Object execute(final ExecutionEvent event) throws ExecutionException {
final IWorkbenchWindow window = HandlerUtil
.getActiveWorkbenchWindowChecked(event);
final BookInfo book = (BookInfo) ((IStructuredSelection) HandlerUtil
.getCurrentSelectionChecked(event)).getFirstElement();
MessageDialog.openInformation(window.getShell(), "Book Info", book
.toString());
return null;
}
}


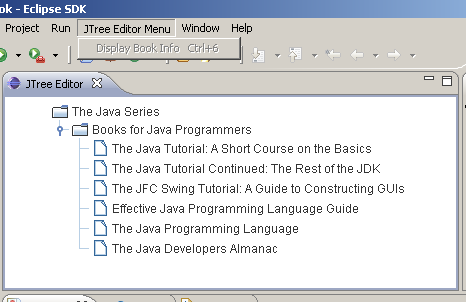
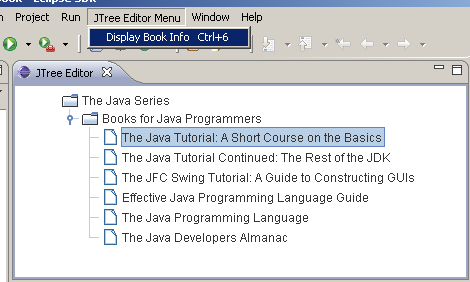
If we run with our SWT_AWT launch configuration again, this time, we will notice the new command contribution and we will see that the selection of different TreeNodes affects the behavior of the command contribution.
When no BookInfo is selected, the command is disabled.

When exactly one BookInfo is selected, the command is enabled.

The BookInfo is displayed in a message dialog.

Friday, December 12, 2008

JMeter in Eclipse and Hudson

Goal


The intention of this tutorial is to describe the creation of an Axis2 WebService in Eclipse along with the setup of JMeter for functionally testing that WebService. The user will go through the steps of manually testing the WebService in a single instance, then will use JMeter to automate multiple runs of the test case, and finally will use Hudson to automate the running of the JMeter Test Plan with Ant.

Create an Axis2 WebService


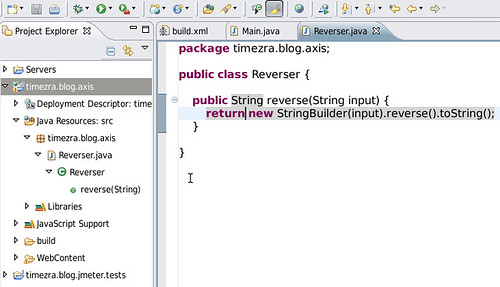
We want to deploy a new WebService in Eclipse using Axis2 and Tomcat. Here we can create an Axis2 project called timezra.blog.axis along with a simple service implementation that returns the reverse of an input String.


package timezra.blog.axis;

public class Reverser {
public String reverse(String input) {
return new StringBuilder(input).reverse().toString();
}
}


An Axis2 project with the service implementation.

Manually Test The WebService


After deploying the WebService, we can use a tool such as SoapUI for Eclipse to create a WebService request.


<soapenv:Envelope xmlns:soapenv="http://schemas.xmlsoap.org/soap/envelope/" xmlns:axis="http://axis.blog.timezra">
<soapenv:Header/>
<soapenv:Body>
<axis:reverse>
<axis:input>?</axis:input>
</axis:reverse>
</soapenv:Body>
</soapenv:Envelope>


A JMeter Project in Eclipse


JMeter is not well-integrated into Eclipse, but we can still run it from the Eclipse environment. First, we will create a New -> Project... -> Java Project called timezra.blog.jmeter.tests. We will need to set Properties -> Java Build Path -> Source -> Default output folder to a directory other than bin. JMeter houses its executables in the bin, but this directory is cleaned by the Eclipse builder when it re-compiles any project source code. Now we can download the JMeter binary distribution and unpack the contents directly into the timezra.blog.jmeter.tests project. For our particular JMeter tests, we will also want to put the Beanshell, Junit 4, and java mail jars into the lib, lib/junit and lib directories, respectively. Beanshell will be used for writing Beanshell Assertions and Post-processors in our test cases. JUnit 4 will provide access to JUnit assertions and Hamcrest Matchers in Beanshell. Java mail is necessary for running WebService Samplers.

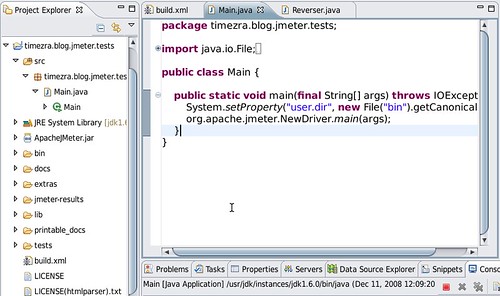
I tend to prefer using a custom Main runner to using the JMeter bat and shell scripts from inside Eclipse. A simple runner only contains a few lines of code.


package timezra.blog.jmeter.tests;

import java.io.File;
import java.io.IOException;

public class Main {
public static void main(final String[] args) throws IOException {
System.setProperty("user.dir", new File("bin").getCanonicalPath());
org.apache.jmeter.NewDriver.main(args);
}
}


The JMeter Eclipse Project With Main Runner
The JMeter Eclipse Project.

Run JMeter From Eclipse


Now that we have a main runner, we can go to src -> Run As -> Java Application. We may need to adjust the heap settings of the launch configuration to something along the lines of -Xms40m -Xmx512m as our Test Plans become more robust.
Suppose we want to run our WebService using input from a CSV file. Let's save our initial Test plan as /timezra.blog.jmeter.tests/tests/ReverseTest.jmx. We will also want to save a data file called /timezra.blog.jmeter.tests/tests/ReverseTestData.csv, and in here we can include a few test messages for the WebService. Below is a snippet from a test file with 500 lines that can easily be generated:

This is input 1 to the WebService.
This is input 2 to the WebService.
This is input 3 to the WebService.
....
This is input 500 to the WebService.

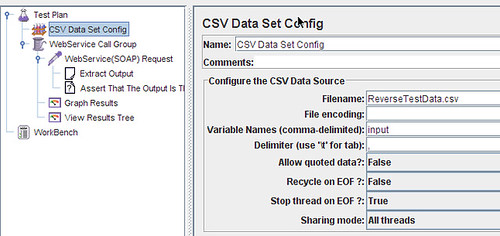
From the JMeter test, we can use each line of input by creating a Test Plan -> Add -> Config Element -> CSV Data Set Config. The file name is relative to the Test Plan. Our variable can be called input. All threads can share the file.
The CSV Data Set Config

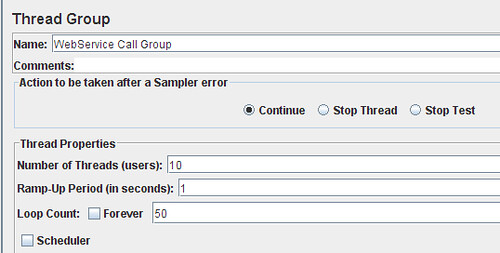
We can now create the Test Plan -> Add -> Thread Group that will run the WebService test. Our number of threads can be set to 10 and the loop count can be set to 50, i.e., there will be 10 concurrent requests in 50 batches.
The Thread Group configuration.

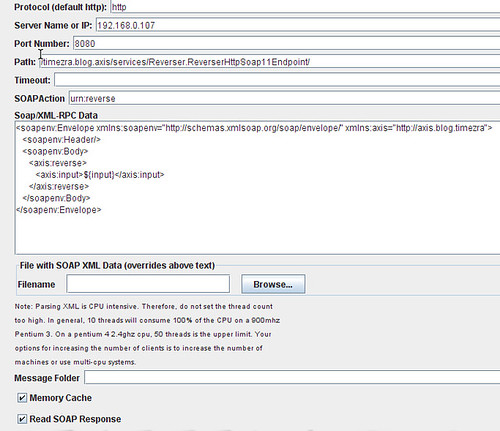
To run the WebService Request we will create a Thread Group -> Add -> Sampler -> WebService(SOAP) Request. Here we can set the WSDL URL (http://localhost:8080/timezra.blog.axis/services/Reverser?wsdl), Load WSDL, Configure and paste the SOAP body from our previous manual test into the SOAP/XML-RPC Data area. To view the SOAP response, we also want to ensure that Read SOAP Response is checked.
The WebService Sampler configuration.

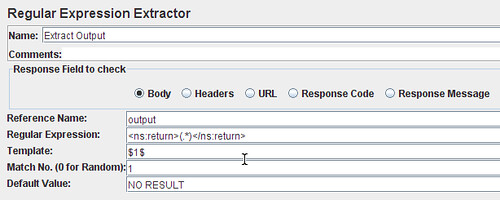
To interpret the response from the WebService request we can include a WebService(SOAP) Request -> Add -> Post Processors -> Regular Expression Extractor and we can assign the contents of the ns:return tag to a variable output.
The Regular Expression Extractor Configuration.

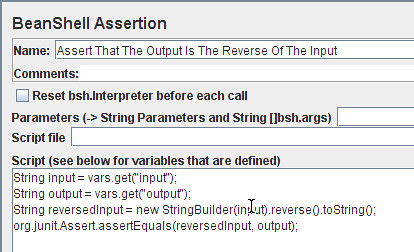
To verify the output, we can create a WebService(SOAP) Request -> Add -> Assertions -> BeanShell Assertion that compares the reversed WebService input with the WebService output.


String input = vars.get("input");
String output = vars.get("output");
String reversedInput = new StringBuilder(input).reverse().toString();
org.junit.Assert.assertEquals(reversedInput, output);


The BeanShell Assertion.
The BeanShell Assertion Configuration.

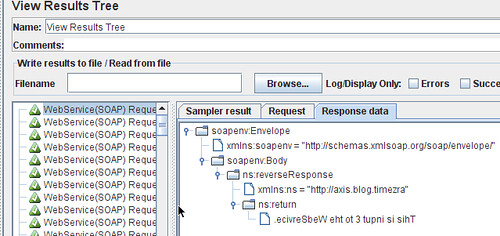
Finally, we can add listeners for reporting on the test run output. Here, we will create a Thread Group -> Add -> Listeners -> View Results Tree and Thread Group -> Add -> Listeners -> Graph Results.
The View Results Tree.
The Tree depicts request and assertion results and specific WebService responses.

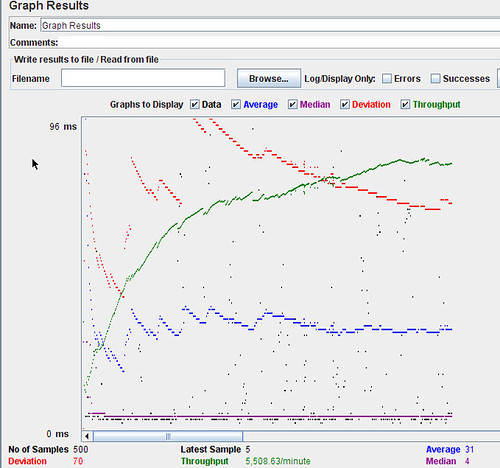
The Graphed Results.
The Graph displays average, median, min and max request times for all thread runs.

Run JMeter From Ant


Now that we have a manual JMeter test, we will automate the process. We can create an Ant file for running the tests from our Continuous Integration server. This build script will also transform the JMeter result JTL file to a human-readable HTML file and place it into an expected build artifacts directory. Fortunately, JMeter provides XSL stylesheets for this transformation in the project extras directory.


<project name="JMeter-Runner" default="run-jmeter-tests">
<property name="jmeter.home" location="." />
<property name="jmeter.tests" location="tests" />
<property name="jmeter.results.dir" location="jmeter-results" />
<property name="jmeter.results.jtl" location="${jmeter.results.dir}/jmeter-results.jtl" />
<property name="jmeter.results.html" location="${jmeter.results.dir}/jmeter-results.html" />
<property name="jmeter.results.xsl" location="extras/jmeter-results-detail-report_21.xsl" />

<taskdef name="jmeter" classname="org.programmerplanet.ant.taskdefs.jmeter.JMeterTask">
<classpath>
<fileset dir="${jmeter.home}/extras">
<include name="ant-jmeter-*.jar" />
</fileset>
</classpath>
</taskdef>

<target name="init">
<mkdir dir="${jmeter.results.dir}" />
</target>

<target name="clean">
<delete failonerror="false">
<fileset dir="${jmeter.results.dir}">
<include name="**/*" />
</fileset>
</delete>
</target>

<target name="reformat-report">
<xslt in="${jmeter.results.jtl}" out="${jmeter.results.html}" style="${jmeter.results.xsl}" />
</target>

<target name="run-jmeter-tests" depends="init, clean">
<jmeter jmeterhome="${jmeter.home}" resultlog="${jmeter.results.jtl}" failureproperty="failure-property">
<property name="jmeter.save.saveservice.output_format" value="xml" />
<property name="jmeter.save.saveservice.response_data.on_error" value="true" />
<testplans dir="${jmeter.tests}" includes="*.jmx" />
</jmeter>
<antcall target="reformat-report" />
<fail>
<condition>
<equals arg1="${failure-property}" arg2="true" />
</condition>
</fail>
</target>
</project>


JMeter In Hudson


Finally, we can setup a Hudson build on Tomcat.
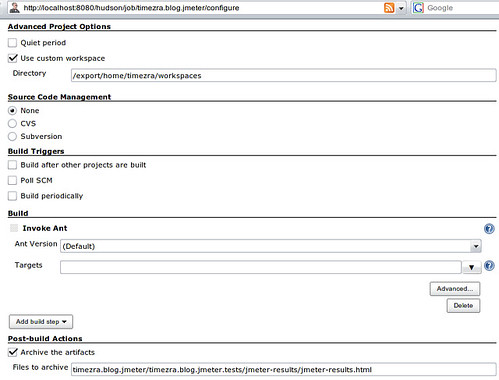
Because we do not have a source control manager, we will point Hudson to a Custom Workspace (under Advanced Project Options), configure the builder to Invoke Ant, and archive the JMeter HTML result report artifact.
The Hudson Build Configuration.

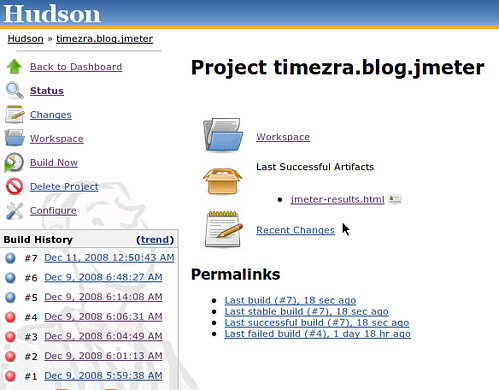
The HTML artifact will now appear on the build results page.
The Build Result Page.

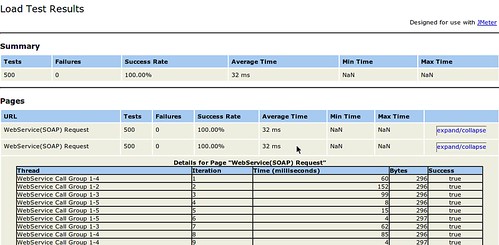
The JMeter Detail Report.
The JMeter Detail Report can be opened in a browser.

Thursday, November 13, 2008

Windows 2000 on Mac Parallels

Windows 2000 Boot Disks


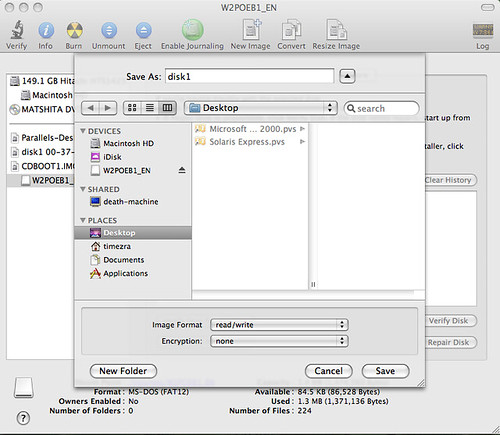
We first need images of the 4 Windows 2000 Boot Disks. After we mount the images, we can use /Applications/Utilities/Disk Utility.app to turn them into *.fdd images for Parallels.
  • Mount the downloaded disk images by double-clicking on them.
  • Run the Disk Utility.app.
  • Select mounted disk n
  • Click on New Image.
  • Name the image disk_n.
  • Select read/write Image Format with no Encryption.
  • Change the name on the filesystem from disk_n.dmg to disk_n.fdd


Save disk images.


Start Parallels


We can start /Applications/Parallels/Parallels Desktop.app and select New... Custom OS Installation using Windows 2000. My personal preference is to increase the default memory size to at least 512MB and to use Bridged Ethernet.
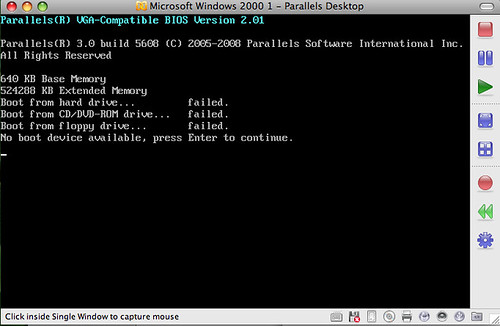
When the virtual machine starts, the floppy drive is not automatically connected, so we get the error No boot device available, press Enter to continue.
No boot device available.

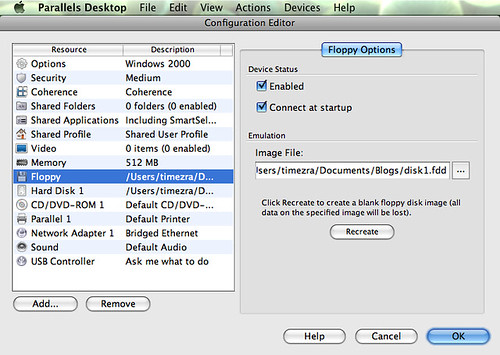
We need to stop the virtual machine, click Floppy Disk on the Configuration screen, select Connect at startup and browse to the disk1.fdd Image File that we created earlier.
Select Connect at startup.

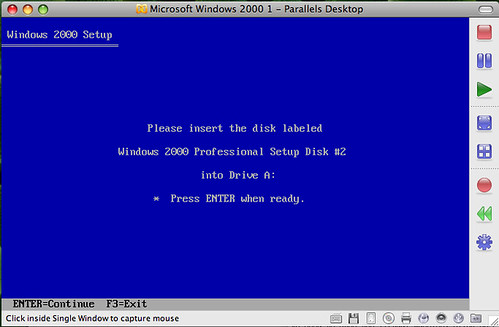
When we restart the virtual machine, the Windows 2000 Setup should appear.
Windows 2000 setup.

We can follow the prompts and switch out the disks by clicking on the floppy in the lower right corner of the screen.
After the 4th disk has been read, then we can insert the Windows 2000 install CD into the CD ROM drive and it will automatically be connected by Parallels.

Install Parallels Tools


After the OS has been installed and we have logged in for the first time, the display is configured for VGA 16 colors with a maximum resolution of 800x600. This problem is easily solvable by choosing Actions - > Install Parallels Tools. These tools also allow drag-and-drop from Mac to Windows and easy browsing across the Mac and Windows file systems.
Install Parallels Tools.

With Open Solaris, OS X and now Windows running on the same piece of hardware without need to reboot to switch between them, it is now possible to eliminate the aging hardware gathering dust in my office.

Tuesday, November 4, 2008

Testing With Spring, Hibernate and JUnit4

This post builds off the functional code and test methods constructed in previous posts. While the techniques in here are not restricted to the features specific to those situations, it might be helpful to review those posts for more context about the original code, the problems that we solved and the patterns that emerged leading to these re-factorings.

Motivation


To use the AbstractTransactionalDataSourceSpringContextTests with JUnit 4 test cases.

The Problem


When our test cases extend AbstractTransactionalDataSourceSpringContextTests, the JUnit 3.8 test runner executes them, so we are not able to use some features available in JUnit 4.

Write a DAO Method and a JUnit 4 Test Case


We will first create a method in the DAO that would benefit from one of the features available in JUnit 4 but not JUnit 3.8, i.e., a verification that the method invocation throws a particular exception deterministically under specific conditions. For the example, the method can simply always throw the expected exception.


public void expectDataAccessException() {
getHibernateTemplate().execute(new HibernateCallback() {
public Object doInHibernate(final Session session) throws HibernateException, SQLException {
throw new SQLException("");
}
});
}


The test case will declare the expectation that the particular exception will be thrown when the method under test is invoked.


@Test(expected = DataAccessException.class)
public void testExpectDataAccessException() throws Exception {
getAuthorDAO().expectDataAccessException();
}


If we run this test now, the test case will fail with an UncategorizedSQLException, even though we have declared our expectation in the annotation.

Re-factor To Composition


The solution is to create a test delegate for Spring-specific configuration (e.g., the setup of the Spring configuration location and the injection of Spring-managed beans) and for Spring datasource transaction management. One of the more powerful features of this particular test base class is that transactions that occur in test cases are rolled back on tear-down, so we generally have no need to worry about test data corruption.


package spring.hibernate.oracle.stored.procedures.dao;

import org.springframework.test.AbstractTransactionalDataSourceSpringContextTests;

public class AbstractTransactionalDataSourceSpringContextTestsDelegate extends
AbstractTransactionalDataSourceSpringContextTests {

private AuthorDAO authorDAO;

public void setup() throws Exception {
super.setUp();
}

public void teardown() throws Exception {
super.tearDown();
}

@Override
protected String[] getConfigLocations() {
return new String[] { "applicationContext.xml" };
}

public AuthorDAO getAuthorDAO() {
return authorDAO;
}

public void setAuthorDAO(final AuthorDAO authorDAO) {
this.authorDAO = authorDAO;
}
}


Now we are ready to remove the delegate code from the test class (and remove the superclass dependency on the AbstractTransactionalDataSourceSpringContextTests that causes the test to execute with the JUnit 3.8 runner). Note that we must declare @Before and @After methods to setup and tear-down the Spring delegate. Also note that we have retained the test-case specific setup (i.e., the population of Authors). Our class consists only of data setup and tests.


package spring.hibernate.oracle.stored.procedures.dao;

import static org.junit.Assert.assertEquals;
import org.junit.After;
import org.junit.Before;
import org.junit.Test;
import org.springframework.dao.DataAccessException;
import spring.hibernate.oracle.stored.procedures.domain.Author;

public class AuthorDAOTest {

private final AbstractTransactionalDataSourceSpringContextTestsDelegate delegate;

public AuthorDAOTest() {
delegate = new AbstractTransactionalDataSourceSpringContextTestsDelegate();
}

@Before
public void setUp() throws Exception {
delegate.setup();
createAuthor(1, "Jules", "Verne");
createAuthor(2, "Charles", "Dickens");
createAuthor(3, "Emily", "Dickinson");
createAuthor(4, "Henry", "James");
createAuthor(5, "William", "James");
createAuthor(6, "Henry", "Thoreau");
}

@After
public void tearDown() throws Exception {
delegate.teardown();
}

@Test
public void testFindByLastNameUsingHQL() throws Exception {
assertEquals(2, delegate.getAuthorDAO().findByLastNameUsingHQL("James").size());
assertEquals(1, delegate.getAuthorDAO().findByLastNameUsingHQL("Verne").size());
assertEquals(1, delegate.getAuthorDAO().findByLastNameUsingHQL("Dickinson").size());
assertEquals(1, delegate.getAuthorDAO().findByLastNameUsingHQL("Dickens").size());
assertEquals(0, delegate.getAuthorDAO().findByLastNameUsingHQL("Whitman").size());
}

@Test
public void testFindByLastNameUsingStoredProcedure() throws Exception {
assertEquals(2, delegate.getAuthorDAO().findByLastNameUsingStoredProcedure("James").size());
assertEquals(1, delegate.getAuthorDAO().findByLastNameUsingStoredProcedure("Verne").size());
assertEquals(1, delegate.getAuthorDAO().findByLastNameUsingStoredProcedure("Dickinson").size());
assertEquals(1, delegate.getAuthorDAO().findByLastNameUsingStoredProcedure("Dickens").size());
assertEquals(0, delegate.getAuthorDAO().findByLastNameUsingStoredProcedure("Whitman").size());
}

@Test
public void testFindByFirstNameUsingFunction() throws Exception {
assertEquals(0, delegate.getAuthorDAO().findByFirstNameUsingFunction("James").size());
assertEquals(2, delegate.getAuthorDAO().findByFirstNameUsingFunction("Henry").size());
}

@Test
public void testUpdate() throws Exception {
final Author author = delegate.getAuthorDAO().findByLastNameUsingHQL("Thoreau").get(0);
author.setLastName("Miller");
delegate.getAuthorDAO().update(author);
assertEquals(1, delegate.getAuthorDAO().findByLastNameUsingHQL("Miller").size());
}

@Test(expected = DataAccessException.class)
public void testExpectDataAccessException() throws Exception {
delegate.getAuthorDAO().expectDataAccessException();
}

private void createAuthor(final int id, final String firstName, final String lastName) {
delegate.getJdbcTemplate().execute(
String.format("insert into author (id, first_name, last_name) values (%d, '%s', '%s')", id, firstName, lastName));
}
}


Observe Lifecycle Events


In order to listen for transaction-specific lifecycle events, we will create an Observer, effectively re-factoring method override to method observation.


package spring.hibernate.oracle.stored.procedures.dao;

public interface ITransactionListener {

void onSetUpBeforeTransaction() throws Exception;

void onSetUpInTransaction() throws Exception;

void onTearDownInTransaction() throws Exception;

void onTearDownAfterTransaction() throws Exception;
}


In the delegate, we now need to broadcast the transaction lifecycle events.


....
private final Collection transactionListeners;

public AbstractTransactionalDataSourceSpringContextTestsDelegate() {
transactionListeners = new ArrayList();
}
....
public void registerTransactionListener(final ITransactionListener listener) {
transactionListeners.add(listener);
}

@Override
protected void onSetUpBeforeTransaction() throws Exception {
super.onSetUpBeforeTransaction();
for (final ITransactionListener listener : transactionListeners)
listener.onSetUpBeforeTransaction();
}

@Override
protected void onSetUpInTransaction() throws Exception {
super.onSetUpInTransaction();
for (final ITransactionListener listener : transactionListeners)
listener.onSetUpInTransaction();
}

@Override
protected void onTearDownInTransaction() throws Exception {
try {
for (final ITransactionListener listener : transactionListeners)
listener.onTearDownInTransaction();
} finally {
super.onTearDownInTransaction();
}
}

@Override
protected void onTearDownAfterTransaction() throws Exception {
try {
for (final ITransactionListener listener : transactionListeners)
listener.onTearDownAfterTransaction();
} finally {
super.onTearDownAfterTransaction();
}
}


We can easily create a tracing transaction listener to demonstrate how this lifecycle observation works.


package spring.hibernate.oracle.stored.procedures.dao;

public class TracingTransactionListener implements ITransactionListener {

public void onSetUpBeforeTransaction() throws Exception {
System.out.println("TracingTransactionListener.onSetUpBeforeTransaction()");
}

public void onSetUpInTransaction() throws Exception {
System.out.println("TracingTransactionListener.onSetUpInTransaction()");
}

public void onTearDownAfterTransaction() throws Exception {
System.out.println("TracingTransactionListener.onTearDownAfterTransaction()");
}

public void onTearDownInTransaction() throws Exception {
System.out.println("TracingTransactionListener.onTearDownInTransaction()");
}
}


We will add this listener to the delegate on test setup. Note that the listener must be registered before the delegate itself is setup.


....
@Before
public void setUp() throws Exception {
delegate.registerTransactionListener(new TracingTransactionListener());
delegate.setup();
....
}


If we run the this test class now, we should note console output that includes these statements:
  • TracingTransactionListener.onSetUpBeforeTransaction()
  • TracingTransactionListener.onSetUpInTransaction()
  • TracingTransactionListener.onTearDownInTransaction()
  • TracingTransactionListener.onTearDownAfterTransaction()

Monday, November 3, 2008

Non-ANSI Oracle ADD_MONTHS Function

Motivation


To use an Oracle function for adding months with the following characteristics:
  • When the resulting month has as many or fewer days than the initial month, and when the initial day of the month is greater than the number of days in the resulting month, then the resulting day should fall on the last day of the resulting month (this is how add_months already works).
  • When the resulting month has more days than the initial month, and when the initial day is the last day of the initial month, then the resulting day of the resulting month should be the same as the initial day (this is not how add_months works).


The Problem


As I had been using the Oracle add_months function for date calculations, I started noticing an unexpected and unintuitive result when a new date is calculated on the last day of certain months. For example,


SELECT add_months(to_date('2009-02-28','YYYY-MM-DD'), 1) FROM dual;

ADD_MONTH
---------
31-MAR-09


I would have expected the resulting date to be 28-MAR-09.

Of course, in the case where the initial month contains more days than the resulting month, I get the results that I expect.


SELECT add_months(to_date('2009-01-31','YYYY-MM-DD'), 1) FROM dual;

ADD_MONTH
---------
28-FEB-09


This feature appears to be part of the ANSI definition for interval math, but this result does not seem particularly intuitive to me.

Unfortunately, the numtoyminterval function only gives the result we expect when go from a month with fewer days to a month with more days, but when going from a month with more days to fewer, it raises an exception when calculating from the last day of the month (or from any day of the month that is greater than the number of days in the resulting month).


SELECT to_date('2009-02-28','YYYY-MM-DD') + numtoyminterval(1, 'month') FROM dual;

TO_DATE('
---------
28-MAR-09

SELECT to_date('2009-01-31','YYYY-MM-DD') + numtoyminterval(1, 'month') FROM dual
*
ERROR at line 1:
ORA-01839: date not valid for month specified


The Function


The function itself is fairly straightforward using a combination of both add_months and numtoyminterval. When we are going from a month with more days to fewer days, then add_months yields the expected result. If we are going from a date with fewer days in the months to a date with more days in the month, then using numtoyminterval is safe because there will be no overflow.


CREATE OR REPLACE FUNCTION non_ansi_add_months
( vDate DATE,
vMonths INTEGER )
RETURN DATE AS
newDate DATE;
BEGIN
newDate := add_months(vDate, vMonths);
IF to_char(vDate, 'DD') < to_char(newDate, 'DD') THEN
newDate := vDate + numtoyminterval(vMonths, 'month');
END IF;
RETURN newDate;
END non_ansi_add_months;


The Result


This function now yields the results we expect.


SELECT non_ansi_add_months(to_date('2009-02-28','YYYY-MM-DD'), 1) FROM dual;

NON_ANSI_
---------
28-MAR-09

SELECT non_ansi_add_months(to_date('2009-01-31','YYYY-MM-DD'), 1) FROM dual;

NON_ANSI_
---------
28-FEB-09


The function even works as expected when adding negative months (calculating month intervals in the past). For example,


SELECT non_ansi_add_months(to_date('2009-02-28','YYYY-MM-DD'), -1) FROM dual;

NON_ANSI_
---------
28-JAN-09

SELECT non_ansi_add_months(to_date('2009-03-30','YYYY-MM-DD'), -1) FROM dual;

NON_ANSI_
---------
28-FEB-09

Sunday, November 2, 2008

Hibernate Updates and Oracle Stored Procedures

This is a continuation of a previous post and builds on the project setup contained therein.

Motivation: It is sometimes desirable to use Oracle stored procedures for standard CUD (create, update, delete) operations; for example, when re-factoring a database to remove trigger calls, one possible solution would be to allow modifications to tables only through procedures. The operations performed by triggers can then be moved into these procedures.

Add an Update Method


We will first use Hibernate's built-in support for updating our Author domain Object. We can add a new method to the AuthorDAO to examine its behavior.


....
public void update(final Author author) {
getHibernateTemplate().update(author);
}
....


Add a Test Case


We generally should not test the frameworks that we use, but here we will be moving outside of the framework. We want to make sure that using our custom update stored procedure will not break the existing behavior that Hibernate provides to us, so we will add a new verification of update behavior to the AuthorDAOTest.


....
@Test
public void testUpdate() throws Exception {
final Author author = getAuthorDAO().findByLastNameUsingHQL("Thoreau").get(0);
author.setLastName("Miller");
getAuthorDAO().update(author);
assertEquals(1, getAuthorDAO().findByLastNameUsingHQL("Miller").size());
}
....


Write a Stored Procedure


Now we will write our custom update stored procedure. To figure out the procedure's argument signature, we can look at the Hibernate console output when we run the test case above. We should note the order of the arguments, which is alphabetic for the updated fields with the primary key in the last position.
  • Hibernate: update MY_ORCL.AUTHOR set FIRST_NAME=?, LAST_NAME=? where ID=?

This order must be maintained in our stored procedure call. We can also use this statement as the basis for the update contained in the procedure body.
We can create this stored procedure through SQLPlus.


CREATE OR REPLACE PROCEDURE update_author
( vFirstName IN author.first_name%type,
vLastName IN author.last_name%type,
vId IN author.id%type ) AS
BEGIN
UPDATE author SET first_name=vFirstName, last_name=vLastName where id=vId;
END update_author;


Call the Stored Procedure From @SQLUpdate


Now that we have a procedure in our schema, we need a way to call it from our DAO. Hibernate provides annotations specific to these CUD operations
  • @org.hibernate.annotations.SQLUpdate
  • @org.hibernate.annotations.SQLInsert
  • @org.hibernate.annotations.SQLDelete
  • @org.hibernate.annotations.SQLDeleteAll

Here, we can add the custom update to our Author domain Object, alongside the named queries from the last tutorial.


....
@Entity
@org.hibernate.annotations.NamedNativeQuery(name = "findByLastName", query = "call findByLastName(?, :vLastName)", callable = true, resultClass = Author.class)
@javax.persistence.NamedNativeQuery(name = "findByFirstName", query = "{ ? = call findByFirstName(:vFirstName) }", resultClass = Author.class, hints = { @javax.persistence.QueryHint(name = "org.hibernate.callable", value = "true") })
@org.hibernate.annotations.SQLUpdate(sql = Author.UPDATE_AUTHOR)
@Table(name = "AUTHOR", schema = "MY_ORCL")
public class Author implements java.io.Serializable {

public static final String UPDATE_AUTHOR = "call update_author(:vFirstName, :vLastName, :vId)";
....


If we run our test case again, we will see that the stored procedure is now called to perform the update.
  • Hibernate: call update_author(:vFirstName, :vLastName, :vId)


Write a Hibernate Interceptor


Suppose we would like to pass an extra parameter to the stored procedure, say a counter for the number of times this procedure has been called from a particular instance of an application. We can modify our argument list with an extra parameter, here adding the counter at the end.


CREATE OR REPLACE PROCEDURE update_author
( vFirstName IN author.first_name%type,
vLastName IN author.last_name%type,
vId IN author.id%type,
vCounter INTEGER ) AS
BEGIN
UPDATE author SET first_name=vFirstName, last_name=vLastName where id=vId;
END update_author;


We will also need to modify the call syntax where it is declared in the domain Object to accept this new parameter.


....
public class Author implements java.io.Serializable {

public static final String UPDATE_AUTHOR = "call update_author(:vFirstName, :vLastName, :vId, :vCounter)";
....


Finally, we can write an Interceptor that will set the counter value in this parameter. The Interceptor will increment a static field each time the update_author procedure is called. This counter is passed to the stored procedure.


package spring.hibernate.oracle.stored.procedures.domain;

import java.util.concurrent.atomic.AtomicLong;
import org.hibernate.EmptyInterceptor;

public class UpdateAuthorInterceptor extends EmptyInterceptor {

private static final long serialVersionUID = 2908952460484632623L;
private static final AtomicLong counter = new AtomicLong();

@Override
public String onPrepareStatement(final String sql) {
if (sql.equals(Author.UPDATE_AUTHOR)) {
return sql.replaceFirst(":vCounter", String.valueOf(counter.getAndIncrement()));
}
return super.onPrepareStatement(sql);
}
}


Now we will configure the Interceptor in the applicationContext.xml for use by the LocalSessionFactoryBean.


....
<bean id="sessionFactory"
class="org.springframework.orm.hibernate3.LocalSessionFactoryBean">
....
<property name="entityInterceptor" ref="updateAuthorInterceptor" />
</bean>
<bean id="updateAuthorInterceptor"
class="spring.hibernate.oracle.stored.procedures.domain.UpdateAuthorInterceptor" />
....


If we run the test case again, we will see console output indicating that Hibernate is calling the update procedure with this counter value.
  • Hibernate: call update_author(:vFirstName, :vLastName, :vId, 0)


Other CUD Operations


With these same steps, we can customize Create (@SQLInsert) and Delete (@SQLDelete and @SQLDeleteAll) operations to use stored procedures.

Saturday, November 1, 2008

Solipse on Parallels

Solipse has recently been updated for the latest stable version of Eclipse Ganymede (3.4.1).
One quick note on this update:
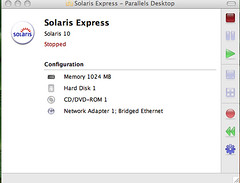
Recently, I acquired a Mac and installed Parallels with a trial license. Installation of SXCE b91 went smoothly, except a few of the default settings needed tweaking, i.e., the memory must be at least 768MB (I bumped mine to 1024 MB) or else there are Out of Memory errors, and the network adapter must be Bridged Ethernet to connect over WiFi.
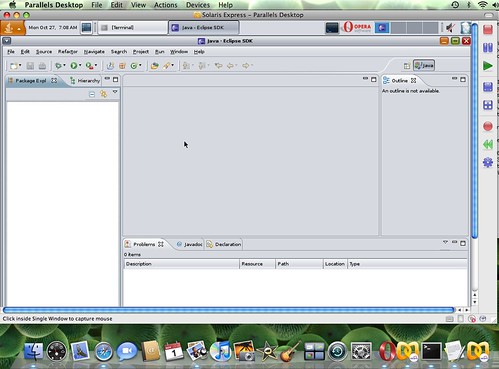
Solaris Express on Mac Parallels

Opera is the first piece of software I always install. After that, I decided to try the eclipse solaris-gtk-x86 build since the latest version supported by the solipse script was out-of-date, because a user had reported a bug in our provisioning of the SDK Profile, because I wanted to see if Eclipse would be affected at all by the changes in JDK 6u10 and because I wanted to see how well Parallels would manage with such a memory intensive process.
Downloading and installing the pre-requisite software (SunStudio 11, which I have on a local share, JDKs 1.4, 5 and 6 and Apache Ant 1.7.1, which I prefer to the default 1.6.5 installation in SXCE) went as easily as possible.
My first attempt at a 3.4.1 build did not go quite as well as I had hoped. Eventually I ended up reverting to 3.4.0 because the provisioning bug was more pressing than the version upgrade. The build time decreased by half compared to my other SXCE installation (on a dual processor P3 at 1GHz per chip with 2 GB RAM). The time went from 75 minutes to 44.
After successfully fixing the p2 bug in the script and building and provisioning 3.4.0 with JDK 6u10, my final task was to figure out what had changed in the Eclipse build between 3.4.0 and 3.4.1. Eventually I found the culprit -- a modified classpath in the org.eclipse.osgi plug-in build.xml. Yet another find-and-replace went into the solipse script along with a few more parameters for versioning information, and soon the build was humming to a happy completion.
Solaris Express on Mac Parallels

My trial period for Parallels has not yet expired! The savings in build time alone will easily make the cost of a license worthwhile....

Friday, October 31, 2008

Spring, Hibernate and Oracle Stored Procedures

Motivation: While there are a few resources available online for calling stored procedures from Hibernate, it took me a while to stumble across one that mostly captures what I need. The intention of this blog entry is to put a similar example into my own words, to extend it slightly and hopefully to help anyone not experienced with Hibernate and Oracle to integrate Stored Procedures and Functions into an application quickly.

Setup Oracle 10g


For this example, we will be using Oracle 10g. We can initialize our schema user with SQLPlus with the following commands:
  • sqlplus connect as sysdba
  • create user my_orcl identified by my_orcl;
  • grant create session to my_orcl;
  • grant resource to my_orcl;
  • grant create table to my_orcl;


Setup a Project For Spring and Hibernate


We will download spring-framework-2.5.5-with-dependencies.zip, hibernate-distribution-3.3.1.GA-dist.zip and hibernate-annotations-3.4.0.GA.zip. We can create a standard project layout of src, test and lib folders with the following jars on the classpath:

  • spring-framework-2.5.5/dist/spring.jar
  • spring-framework-2.5.5/dist/modules/spring-test.jar
  • spring-framework-2.5.5/lib/jakarta-commons/commons-logging.jar
  • spring-framework-2.5.5/lib/jakarta-commons/commons-dbcp.jar
  • spring-framework-2.5.5/lib/jakarta-commons/commons-pool.jar
  • spring-framework-2.5.5/lib/jakarta-commons/commons-collections.jar
  • spring-framework-2.5.5/lib/dom4j/dom4j-1.6.1.jar
  • spring-framework-2.5.5/lib/log4j/log4j-1.2.15.jar
  • spring-framework-2.5.5/lib/slf4j/slf4j-api-1.5.0.jar
  • spring-framework-2.5.5/lib/slf4j/slf4j-log4j12-1.5.0.jar
  • spring-framework-2.5.5/lib/j2ee/*.jar
  • hibernate-annotations-3.4.0.GA/hibernate-annotations.jar
  • hibernate-annotations-3.4.0.GA/lib/hibernate-commons-annotations.jar
  • hibernate-distribution-3.3.1.GA/hibernate3.jar
  • hibernate-distribution-3.3.1.GA/lib/required/javassist-3.4.GA.jar
  • hibernate-distribution-3.3.1.GA/lib/required/slf4j-api-1.5.2.jar


Because we will be using Oracle Stored Procedures, we will also need a database driver such as

  • oracle/product/10.2.0/db_1/jdbc/lib/ojdbc14.jar


Create Domain Objects


We can setup our domain using annotated Java. For these examples, we need one simple domain Object.


package spring.hibernate.oracle.stored.procedures.domain;

import javax.persistence.Column;
import javax.persistence.Entity;
import javax.persistence.Id;
import javax.persistence.Table;

@Entity
@Table(name = "AUTHOR", schema = "MY_ORCL")
public class Author implements java.io.Serializable {

private static final long serialVersionUID = 8676058601610931698L;
private int id;
private String firstName;
private String lastName;

@Id
@Column(name = "ID", nullable = false)
public int getId() {
return this.id;
}

public void setId(final int id) {
this.id = id;
}

@Column(name = "FIRST_NAME", nullable = false, length = 50)
public String getFirstName() {
return this.firstName;
}

public void setFirstName(final String firstName) {
this.firstName = firstName;
}

@Column(name = "LAST_NAME", nullable = false, length = 50)
public String getLastName() {
return this.lastName;
}

public void setLastName(final String lastName) {
this.lastName = lastName;
}
}


Create a DAO


Now that we have a domain Object, we can create a DAO for a simple operation, such as looking up Authors by last name. Fortunately, Spring provides a convenient base class for DAO operations.


package spring.hibernate.oracle.stored.procedures.dao;

import java.util.List;
import org.springframework.orm.hibernate3.support.HibernateDaoSupport;
import spring.hibernate.oracle.stored.procedures.domain.Author;

public class AuthorDAO extends HibernateDaoSupport {

@SuppressWarnings("unchecked")
public List<Author> findByLastNameUsingHQL(final String lastName) {
return getHibernateTemplate().find("from Author author where author.lastName = ?", lastName);
}
}


The Spring Application Context Configuration


The Spring applicationContext.xml can reside directly at the root of our src classpath, and it will contain information for configuring Spring to manage our Hibernate sessions, transactions and datasources, as well as our DAO.


<?xml version="1.0" encoding="UTF-8"?>
<beans xmlns="http://www.springframework.org/schema/beans"
xmlns:xsi="http://www.w3.org/2001/XMLSchema-instance"
xsi:schemaLocation="http://www.springframework.org/schema/beans
http://www.springframework.org/schema/beans/spring-beans-2.5.xsd"
default-autowire="constructor">
<bean id="dataSource" class="org.apache.commons.dbcp.BasicDataSource"
destroy-method="close">
<property name="driverClassName" value="oracle.jdbc.driver.OracleDriver" />
<property name="url" value="jdbc:oracle:thin:@localhost:1521:orcl" />
<property name="username" value="my_orcl" />
<property name="password" value="my_orcl" />
</bean>
<bean id="sessionFactory"
class="org.springframework.orm.hibernate3.LocalSessionFactoryBean">
<property name="dataSource" ref="dataSource" />
<property name="configLocation" value="classpath:/hibernate.cfg.xml" />
<property name="configurationClass" value="org.hibernate.cfg.AnnotationConfiguration" />
<property name="hibernateProperties">
<props>
<prop key="hibernate.query.factory_class">org.hibernate.hql.classic.ClassicQueryTranslatorFactory</prop>
<prop key="hibernate.dialect">org.hibernate.dialect.Oracle10gDialect</prop>
<prop key="hibernate.hbm2ddl.auto">create</prop>
<prop key="hibernate.show_sql">true</prop>
</props>
</property>
</bean>
<bean id="transactionManager"
class="org.springframework.orm.hibernate3.HibernateTransactionManager">
<property name="sessionFactory" ref="sessionFactory" />
</bean>
<bean name="authorDAO"
class="spring.hibernate.oracle.stored.procedures.dao.AuthorDAO">
<property name="sessionFactory" ref="sessionFactory" />
</bean>
</beans>


The Hibernate Configuration


The hibernate.cfg.xml can also reside directly in our src/ folder. The primary purpose of this file is to let Hibernate know about our domain class.


<!DOCTYPE hibernate-configuration PUBLIC
"-//Hibernate/Hibernate Configuration DTD 3.0//EN"
"http://hibernate.sourceforge.net/hibernate-configuration-3.0.dtd">
<hibernate-configuration>
<session-factory>
<mapping class="spring.hibernate.oracle.stored.procedures.domain.Author" />
</session-factory>
</hibernate-configuration>


Testing the Setup


Now that our project is setup, we can write a simple test to very that all of our configuration files can be properly loaded and that all of our connections work. We will begin by setting up some simple test data in the database, and then we can call our DAO method to find Authors by their last names. Again, we can take advantage of a convenient Spring base class for our test cases.


package spring.hibernate.oracle.stored.procedures.dao;

import org.junit.Test;
import org.springframework.test.AbstractTransactionalDataSourceSpringContextTests;

public class AuthorDAOTest extends AbstractTransactionalDataSourceSpringContextTests {

private AuthorDAO authorDAO;

@Override
protected void onSetUp() throws Exception {
super.onSetUp();
createAuthor(1, "Jules", "Verne");
createAuthor(2, "Charles", "Dickens");
createAuthor(3, "Emily", "Dickinson");
createAuthor(4, "Henry", "James");
createAuthor(5, "William", "James");
createAuthor(6, "Henry", "Thoreau");
}

@Test
public void testFindByLastNameUsingHQL() throws Exception {
assertEquals(2, getAuthorDAO().findByLastNameUsingHQL("James").size());
assertEquals(1, getAuthorDAO().findByLastNameUsingHQL("Verne").size());
assertEquals(1, getAuthorDAO().findByLastNameUsingHQL("Dickinson").size());
assertEquals(1, getAuthorDAO().findByLastNameUsingHQL("Dickens").size());
assertEquals(0, getAuthorDAO().findByLastNameUsingHQL("Whitman").size());
}

@Override
protected String[] getConfigLocations() {
return new String[] { "applicationContext.xml" };
}

public AuthorDAO getAuthorDAO() {
return authorDAO;
}

public void setAuthorDAO(final AuthorDAO authorDAO) {
this.authorDAO = authorDAO;
}

private void createAuthor(final int id, final String firstName, final String lastName) {
jdbcTemplate.execute(String.format("insert into author (id, first_name, last_name) values (%d, '%s', '%s')", id,
firstName, lastName));
}
}


Write a Stored Procedure


Because we have specified <prop key="hibernate.hbm2ddl.auto">create</prop> in our Spring configuration for Hibernate, the AUTHOR table now exists in the database. We can write a simple stored procedure to query this table.


CREATE OR REPLACE PROCEDURE findByLastName
( res OUT SYS_REFCURSOR,
vLastName IN author.last_name%type ) AS
BEGIN
OPEN res FOR
SELECT * FROM author WHERE last_name = vLastName;
END findByLastName;


Call The Stored Procedure From Hibernate


Now that we have a PL/SQL Stored Procedure, we will need a way to reference it from Hibernate. We can annotate the domain Object with such a named query.


....
@Entity
@org.hibernate.annotations.NamedNativeQuery(name = "findByLastName", query = "call findByLastName(?, :vLastName)", callable = true, resultClass = Author.class)
@Table(name = "AUTHOR", schema = "MY_ORCL")
public class Author implements java.io.Serializable {
....


Now we can add a method to our AuthorDAO for calling this Stored Procedure.


....
@SuppressWarnings("unchecked")
public List<Author> findByLastNameUsingStoredProcedure(final String lastName) {
return (List<Author>) getHibernateTemplate().execute(new HibernateCallback() {
public Object doInHibernate(final Session session) throws HibernateException, SQLException {
return session.getNamedQuery("findByLastName") //
.setParameter("vLastName", lastName) //
.list();
}
});
}
....


Finally, we will add a test case for calling the new DAO method.


....
@Test
public void testFindByLastNameUsingStoredProcedure() throws Exception {
assertEquals(2, getAuthorDAO().findByLastNameUsingStoredProcedure("James").size());
assertEquals(1, getAuthorDAO().findByLastNameUsingStoredProcedure("Verne").size());
assertEquals(1, getAuthorDAO().findByLastNameUsingStoredProcedure("Dickinson").size());
assertEquals(1, getAuthorDAO().findByLastNameUsingStoredProcedure("Dickens").size());
assertEquals(0, getAuthorDAO().findByLastNameUsingStoredProcedure("Whitman").size());
}
....


Write a PL/SQL Function


We can similarly call an Oracle Function. Here, we will use a function that locates Authors by their first names.


CREATE OR REPLACE FUNCTION findByFirstName
( vFirstName IN author.first_name%type )
RETURN SYS_REFCURSOR AS
res SYS_REFCURSOR;
BEGIN
OPEN res FOR
SELECT * FROM author WHERE first_name = vFirstName;
RETURN res;
END findByFirstName;


Call The Function From Hibernate


We can reference this function using an org.hibernate.annotations.NamedNativeQuery, but we can also make the scenario a little more interesting by instead using the javax.persistence.NamedNativeQuery annotation in conjunction with the javax.persistence.QueryHint annotation. By using this annotation, note how we have two named queries declared on a single domain Object. Also note the braces that are necessary for the query syntax of the function but are not necessary for the stored procedure call.


....
@Entity
@org.hibernate.annotations.NamedNativeQuery(name = "findByLastName", query = "call findByLastName(?, :vLastName)", callable = true, resultClass = Author.class)
@javax.persistence.NamedNativeQuery(name = "findByFirstName", query = "{ ? = call findByFirstName(:vFirstName) }", resultClass = Author.class, hints = { @javax.persistence.QueryHint(name = "org.hibernate.callable", value = "true") })
@Table(name = "AUTHOR", schema = "MY_ORCL")
public class Author implements java.io.Serializable {
....


Again, we will access this PL/SQL function through our DAO.


....
@SuppressWarnings("unchecked")
public List<Author> findByFirstNameUsingFunction(final String firstName) {
return (List<Author>) getHibernateTemplate().execute(new HibernateCallback() {
public Object doInHibernate(final Session session) throws HibernateException, SQLException {
return session.getNamedQuery("findByFirstName") //
.setParameter("vFirstName", firstName) //
.list();
}
});
}
....


And finally, we can add another simple test for this function call.


....
@Test
public void testFindByFirstNameUsingFunction() throws Exception {
assertEquals(0, getAuthorDAO().findByFirstNameUsingFunction("James").size());
assertEquals(2, getAuthorDAO().findByFirstNameUsingFunction("Henry").size());
}
....


Hopefully, this step-by-step process gives a good starting point for creating more complex stored procedure and function calls using Spring, Hibernate and Oracle.

Next: Hibernate updates and stored procedures ->

Saturday, September 6, 2008

Spring, Hibernate and JAX-WS WebServices on Weblogic

Purpose


This post concentrates the information presented in the Spring MVC Tutorial and the Spring WebServices Tutorial and adds information specific to configuring an application for Weblogic. The goal is to get a working application running from end-to-end (jsp or webservice -> hibernate -> database) very quickly.

Development and Deployment Environments


The development environment assumed for the tutorial is Eclipse 3.4 with Ant 1.7.1 for building. For Continuous Integration, I recommend Hudson. There is nothing specific about those components and versions, just that they are a familiar development environment for me.
For deployment, we will be using Spring 2.5.5 with Hibernate Core 3.3 and Hibernate Annotations 3.4 on Weblogic Server 10.3. For the database, we can use the HSQLDB 1.8 that comes with the Spring 2.5 distribution with dependencies.
For this project also, we will need to setup a Weblogic domain for deployment. Here, we can use a domain called spring.hibernate.webservices and we can use all the default settings (e.g., Sun JDK, port 7001, Development configuration).

Initial Project Setup


We will setup the project as described in the Spring Tutorial.
For this, we can name the project spring.hibernate.webservices.weblogic.
We can create the following directories:
src directory for any Java source files.
war directory for the index file.
war/WEB-INF directory for the web.xml file.
war/WEB-INF/jsp directory for the jsp files.
war/WEB-INF/lib directory for library dependencies.
war/WEB-INF/classes directory for compiled classes.
We can create the initial web.xml as described in the tutorial.


<?xml version="1.0" encoding="UTF-8"?>
<web-app version="2.4"
xmlns="http://java.sun.com/xml/ns/j2ee"
xmlns:xsi="http://www.w3.org/2001/XMLSchema-instance"
xsi:schemaLocation="http://java.sun.com/xml/ns/j2ee
http://java.sun.com/xml/ns/j2ee/web-app_2_4.xsd" >

<servlet>
<servlet-name>spring.hibernate.webservices.weblogic</servlet-name>
<servlet-class>org.springframework.web.servlet.DispatcherServlet</servlet-class>
<load-on-startup>1</load-on-startup>
</servlet>

<servlet-mapping>
<servlet-name>spring.hibernate.webservices.weblogic</servlet-name>
<url-pattern>*.htm</url-pattern>
</servlet-mapping>

<welcome-file-list>
<welcome-file>
index.jsp
</welcome-file>
</welcome-file-list>

</web-app>


We will also create a build.xml file in the root of the project. The Spring tutorial uses tasks specific to Tomcat. Here, we can setup tasks specific to the Weblogic domain we have created without explicitly setting up the Weblogic domain environment.


<?xml version="1.0"?>
<project name="spring.hibernate.webservices.weblogic" basedir="." default="deploy">

<property name="src.dir" value="src" />
<property name="web.dir" value="war" />
<property name="dist.dir" value="dist" />
<property name="build.dir" value="${web.dir}/WEB-INF/classes" />
<property name="name" value="spring.hibernate.webservices.weblogic" />

<path id="master-classpath">
<fileset dir="${web.dir}/WEB-INF/lib">
<include name="*.jar" />
</fileset>
<pathelement path="${build.dir}" />
</path>

<target name="init">
<mkdir dir="${build.dir}" />
<mkdir dir="${dist.dir}" />
</target>

<target name="build" depends="init" description="Compile main source tree java files">
<javac destdir="${build.dir}" source="1.5" target="1.5" debug="true" deprecation="false" optimize="false" failonerror="true">
<src path="${src.dir}" />
<classpath refid="master-classpath" />
<classpath refid="weblogic-classpath" />
</javac>
</target>

<target name="build-war" depends="build" description="Packages the war file">
<war destfile="${dist.dir}/${name}.war" webxml="${web.dir}/WEB-INF/web.xml">
<fileset dir="${web.dir}">
<include name="**/*.*" />
</fileset>
</war>
</target>

<!-- ============================================================== -->
<!-- Start Weblogic Tasks -->
<!-- ============================================================== -->

<property name="weblogic.home" location="C:/Tim/WebServers/bea" />
<property name="weblogic.domain" location="${weblogic.home}/user_projects/domains/spring_webservices" />

<path id="weblogic-classpath">
<fileset dir="${weblogic.home}/wlserver_10.3/server/lib">
<include name="*.jar" />
</fileset>
</path>

<macrodef name="run-domain-task">
<attribute name="task.name" />
<sequential>
<property name="runner" location="${weblogic.domain}/bin/run_domain_task.cmd" />
<copy file="${weblogic.domain}/bin/setDomainEnv.cmd" tofile="${runner}" overwrite="true" />
<concat append="true" destfile="${runner}">ant -f "${ant.file}" @{task.name}</concat>
<exec executable="${runner}" />
</sequential>
</macrodef>

<taskdef name="wldeploy" classname="weblogic.ant.taskdefs.management.WLDeploy">
<classpath refid="weblogic-classpath" />
</taskdef>

<target name="deploy-to-domain">
<property name="weblogic.username" value="weblogic"></property>
<property name="weblogic.password" value="weblogic"></property>
<property name="weblogic.adminurl" value="t3://localhost:7001"></property>
<property name="weblogic.targets" value="AdminServer"></property>
<wldeploy action="deploy" verbose="true" debug="true" name="${name}" source="${dist.dir}/${name}.war" user="${weblogic.username}" password="${weblogic.password}" adminurl="${weblogic.adminurl}" targets="${weblogic.targets}" />
</target>

<target name="deploy" depends="build-war" description="Deploys the project .war file">
<run-domain-task task.name="deploy-to-domain" />
</target>

<!-- End Weblogic tasks -->

</project>


If we start the Weblogic domain, deploy this script and open a browser with the URL http://localhost:7001/spring.hibernate.webservices.weblogic/, we should now see our hello world application.

Setup Spring MVC


Setting up the initial Spring libraries, controller and jsp should be exactly the same as described in the tutorial. There is nothing specific to Weblogic here.
As the tutorial indicates, we will copy spring.jar, spring-webmvc.jar, commons-logging.jar, standard.jar and jstl.jar to our WEB-INF/lib directory, and we will add these to the project build path.
Please note also that, in Eclipse, we will want to create a new user library that includes all the .jar files in <weblogic_home>/wlserver_10.3/server/lib and all the glassfish*.jar and javax*.jar files in <weblogic_home>/modules and we will want to add this to the build path.
We can also declare a servlet named spring.hibernate.webservices.weblogic and its servlet-mapping in the web.xml file, and we can add the Spring configuration file spring.hibernate.webservices.weblogic-servlet.xml to the WEB-INF directory.
To make the example slightly more interesting, instead of simply displaying a static hello world page, we will autowire a stub DAO and display the information it returns.
Suppose we have a simple domain object Person:


package spring.hibernate.webservices.weblogic.domain;

public class Person {

private final String firstName;
private final String lastName;

public Person(final String firstName, final String lastName) {
this.firstName = firstName;
this.lastName = lastName;
}

public String getFirstName() {
return firstName;
}

public String getLastName() {
return lastName;
}
}


Suppose we have a stub PersonDAO that returns a collection of Person objects.


package spring.hibernate.webservices.weblogic.dao;

import java.util.Arrays;
import java.util.Collection;
import spring.hibernate.webservices.weblogic.domain.Person;

public class PersonDAO {
public Collection findAll() {
return Arrays.asList(new Person("John", "Smith"), new Person("Jane", "Doe"), new Person("Jim", "Jones"));
}
}


Our HelloController will be autowired through the constructor with the PersonDAO and will put the stub People into the Model:


package spring.hibernate.webservices.weblogic;

import java.io.IOException;
import java.util.HashMap;
import javax.servlet.ServletException;
import javax.servlet.http.HttpServletRequest;
import javax.servlet.http.HttpServletResponse;
import org.springframework.beans.factory.annotation.Autowired;
import org.springframework.web.context.support.SpringBeanAutowiringSupport;
import org.springframework.web.servlet.ModelAndView;
import org.springframework.web.servlet.mvc.Controller;
import spring.hibernate.webservices.weblogic.dao.PersonDAO;

public class HelloController extends SpringBeanAutowiringSupport implements Controller {

private final PersonDAO personDAO;

@Autowired
public HelloController(final PersonDAO personDAO) {
this.personDAO = personDAO;
}

public ModelAndView handleRequest(final HttpServletRequest request, final HttpServletResponse response)
throws ServletException, IOException {
final HashMap<String, Object> model = new HashMap<String, Object>();
model.put("people", personDAO.findAll());
return new ModelAndView("hello", "model", model);
}
}


As described in the tutorial, we can create a header for including standard jstl tags called WEB-INF/include.jsp:


<%@ page session="false"%>
<%@ taglib prefix="c" uri="http://java.sun.com/jsp/jstl/core" %>
<%@ taglib prefix="fmt" uri="http://java.sun.com/jsp/jstl/fmt" %>


We can modify our index page to point to the new hello page we will create:


<%@ include file="/WEB-INF/jsp/include.jsp" %>
<c:redirect url="/hello.htm"/>


We can create a WEB-INF/hello.jsp that displays the information from our DAO:


<%@ include file="/WEB-INF/jsp/include.jsp" %>
<html>
<head><title>Hello Spring on Weblogic</title></head>
<body>
<h1>Hello Spring on Weblogic</h1>
<h3>People</h3>
<TABLE>
<TR>
<TH>First Name</TH>
<TH>Last Name</TH>
</TR>
<c:forEach items="${model.people}" var="person">
<TR>
<TD><c:out value="${person.firstName}"/></TD>
<TD><c:out value="${person.lastName}"/></TD>
</TR>
</c:forEach>
</TABLE>
</body>
</html>


Finally, we can add content to the spring.hibernate.webservices.weblogic-servlet.xml spring configuration file to declare not only that Spring will manage the HelloController but also the PersonDAO and that default auto-wiring should occur through the constructor:


<?xml version="1.0" encoding="UTF-8"?>
<beans xmlns="http://www.springframework.org/schema/beans"
xmlns:xsi="http://www.w3.org/2001/XMLSchema-instance"
xsi:schemaLocation="http://www.springframework.org/schema/beans
http://www.springframework.org/schema/beans/spring-beans-2.5.xsd"
default-autowire="constructor">
<bean name="/hello.htm" class="spring.hibernate.webservices.weblogic.HelloController" />
<bean name="personDAO" class="spring.hibernate.webservices.weblogic.dao.PersonDAO"/>
<bean id="viewResolver" class="org.springframework.web.servlet.view.InternalResourceViewResolver">
<property name="viewClass" value="org.springframework.web.servlet.view.JstlView"></property>
<property name="prefix" value="/WEB-INF/jsp/"></property>
<property name="suffix" value=".jsp"></property>
</bean>
</beans>


Note that if we do not specify constructor auto-wiring and allow Spring to auto-wire byType, we will need to setup a context param and context listener in the web.xml file in order to get a non-null DAO. We will also need this org.springframework.web.context.ContextLoaderListener to ensure that the WebApplicationContext has been initialized before our WebService is called the first time, so we can register it now, even though it is not absolutely necessary yet.


<?xml version="1.0" encoding="UTF-8"?>
<web-app version="2.4"
xmlns="http://java.sun.com/xml/ns/j2ee"
xmlns:xsi="http://www.w3.org/2001/XMLSchema-instance"
xsi:schemaLocation="http://java.sun.com/xml/ns/j2ee
http://java.sun.com/xml/ns/j2ee/web-app_2_4.xsd" >

<context-param>
<param-name>contextConfigLocation</param-name>
<param-value>/WEB-INF/spring.hibernate.webservices.weblogic-servlet.xml</param-value>
</context-param>

<servlet>
<servlet-name>spring.hibernate.webservices.weblogic</servlet-name>
<servlet-class>org.springframework.web.servlet.DispatcherServlet</servlet-class>
<load-on-startup>1</load-on-startup>
</servlet>

<servlet-mapping>
<servlet-name>spring.hibernate.webservices.weblogic</servlet-name>
<url-pattern>*.htm</url-pattern>
</servlet-mapping>

<welcome-file-list>
<welcome-file>
index.jsp
</welcome-file>
</welcome-file-list>

<listener>
<listener-class>org.springframework.web.context.ContextLoaderListener</listener-class>
</listener>

</web-app>


Setup Hibernate


For this example we can use the hsqldb that comes with the Spring distribution. We can setup some infrastructure for the project by creating the following directories:
database-resources
database-resources/scripts
database-resources/hibernate
We can put the hsqldb.jar into war/WEB-INF/lib because it will need to be deployed with our application.
We can put a simple script called createdb.hsql that creates a database with a Person table in database-resources/scripts.


DROP TABLE IF EXISTS person;
CREATE TABLE person (
id INTEGER NOT NULL IDENTITY,
first_name VARCHAR(50) NOT NULL,
last_name VARCHAR(50) NOT NULL
);


We can put a simple script called populatedb.hsql that populates the Person table in database-resources/scripts.


INSERT INTO person (id, first_name, last_name) values(1, 'John', 'Smith');
INSERT INTO person (id, first_name, last_name) values(2, 'Jane', 'Doe');
INSERT INTO person (id, first_name, last_name) values(3, 'Jim', 'Jones');


We can start and populate the database in our build.xml.


<!-- Start Database tasks -->

<property name="db.url" value="jdbc:hsqldb:hsql://localhost/${name}" />
<property name="db.username" value="sa" />
<property name="db.password" value="" />

<target name="hsqldb-start" description="Starts an HSQL Database.">
<java classname="org.hsqldb.Server" classpathref="master-classpath" fork="true" spawn="true">
<arg line="-database.0 file:${name}" />
<arg line="-dbname.0 ${name}" />
</java>
</target>

<target name="hsqldb-stop" description="Stops an HSQL database.">
<script language="javascript" classpathref="master-classpath">
<![CDATA[
java.sql.DriverManager.registerDriver(new org.hsqldb.jdbcDriver());
con = java.sql.DriverManager.getConnection(project.getProperty("db.url"), project.getProperty("db.username"), project.getProperty("db.password"));
sql = "SHUTDOWN";
stmt = con.createStatement();
stmt.executeUpdate(sql);
stmt.close();
]]>
</script>
</target>

<target name="create-database" description="Create the database.">
<sql driver="org.hsqldb.jdbcDriver" url="${db.url}" userid="${db.username}" password="${db.password}" onerror="continue" src="database-resources/scripts/createdb.hsql">
<classpath refid="master-classpath" />
</sql>
<sql driver="org.hsqldb.jdbcDriver" url="${db.url}" userid="${db.username}" password="${db.password}" onerror="continue" src="database-resources/scripts/populatedb.hsql">
<classpath refid="master-classpath" />
</sql>
</target>

<!-- End Database tasks -->


Note that the task hsqldb-stop, which is based on a similar beanshell task, uses javascript and so requires that either the rhino libraries be on our classpath or that we use Hotspot JDK6. We use this task instead of the standard (below) because it successfully shuts down the database without failing the build with the error java.sql.SQLException: Connection is broken.


<target name="hsqldb-stop">
<sql driver="org.hsqldb.jdbcDriver" url="${db.url}" userid="${db.username}" password="${db.password}" onerror="continue">
<classpath refid="master-classpath" />
SHUTDOWN;
</sql>
</target>


Now that we have a database and a Person table, we can fill out our domain object with annotations. For this example, we can use the Hibernate Tools for Eclipse 3.4 and reverse-engineer the Java class from the schema by creating database-resources/hibernate/hibernate.cfg.xml and hibernate.reveng.xml files.


package spring.hibernate.webservices.weblogic.domain;

import javax.persistence.Column;
import javax.persistence.Entity;
import javax.persistence.Id;
import javax.persistence.Table;

/**
* Person generated by hbm2java
*/
@Entity
@Table(name = "PERSON", schema = "PUBLIC")
public class Person implements java.io.Serializable {

private static final long serialVersionUID = -8972977074631290288L;
private int id;
private String firstName;
private String lastName;

public Person() {
}

public Person(final int id, final String firstName, final String lastName) {
this.id = id;
this.firstName = firstName;
this.lastName = lastName;
}

@Id
@Column(name = "ID", unique = true, nullable = false)
public int getId() {
return this.id;
}

public void setId(final int id) {
this.id = id;
}

@Column(name = "FIRST_NAME", nullable = false, length = 50)
public String getFirstName() {
return this.firstName;
}

public void setFirstName(final String firstName) {
this.firstName = firstName;
}

@Column(name = "LAST_NAME", nullable = false, length = 50)
public String getLastName() {
return this.lastName;
}

public void setLastName(final String lastName) {
this.lastName = lastName;
}
}


Before we setup the DAO to use the Spring HibernateTemplate and the Hibernate SessionFactory, we will need to add a few libraries to the war/WEB-INF/lib directory and to our build path:
hibernate3.jar from Hibernate Core
javassist-3.4.GA.jar from Hibernate Core
hibernate-commons-annotations.jar from Hibernate Annotations
hibernate-annotations.jar from Hibernate Annotations
dom4j.jar from Hibernate Annotations
commons-dbcp.jar from the Spring distribution
log4j-1.2.15.jar from the Spring distribution
slf4j-api-1.5.0.jar from the Spring distribution
slf4j-log4j12-1.5.0.jar from the Spring distribution


package spring.hibernate.webservices.weblogic.dao;

import java.util.Collection;
import org.hibernate.SessionFactory;
import org.springframework.beans.factory.annotation.Autowired;
import org.springframework.orm.hibernate3.HibernateTemplate;
import spring.hibernate.webservices.weblogic.domain.Person;

public class PersonDAO {

private final HibernateTemplate hibernateTemplate;

@Autowired
public PersonDAO(final SessionFactory sessionFactory) {
hibernateTemplate = new HibernateTemplate(sessionFactory);
}

@SuppressWarnings("unchecked")
public Collection<Person> findAll() {
return hibernateTemplate.loadAll(Person.class);
}
}


The Spring configuration file must now declare that it is managing the DataSource and Hibernate SessionFactory.


<bean id="dataSource" class="org.apache.commons.dbcp.BasicDataSource"
destroy-method="close">
<property name="driverClassName" value="org.hsqldb.jdbcDriver" />
<property name="url"
value="jdbc:hsqldb:hsql://localhost/spring.hibernate.webservices.weblogic" />
<property name="username" value="sa" />
<property name="password" value="" />
</bean>
<bean id="sessionFactory"
class="org.springframework.orm.hibernate3.LocalSessionFactoryBean">
<property name="dataSource" ref="dataSource" />
<property name="configLocation" value="/WEB-INF/hibernate.cfg.xml" />
<property name="configurationClass" value="org.hibernate.cfg.AnnotationConfiguration" />
<property name="hibernateProperties">
<props>
<prop key="hibernate.query.factory_class">org.hibernate.hql.classic.ClassicQueryTranslatorFactory</prop>
<prop key="hibernate.dialect">org.hibernate.dialect.HSQLDialect</prop>
<prop key="hibernate.show_sql">true</prop>
</props>
</property>
</bean>


Finally, we will also create a hibernate.cfg.xml file to declare that Hibernate is managing our domain.


<!DOCTYPE hibernate-configuration PUBLIC
"-//Hibernate/Hibernate Configuration DTD 3.0//EN"
"http://hibernate.sourceforge.net/hibernate-configuration-3.0.dtd">
<hibernate-configuration>
<session-factory>
<mapping class="spring.hibernate.webservices.weblogic.domain.Person" />
</session-factory>
</hibernate-configuration>


Now if we look at the URL http://localhost:7001/spring.hibernate.webservices.weblogic in a browser, our page should display the names of the people in our createdb.hsql script.
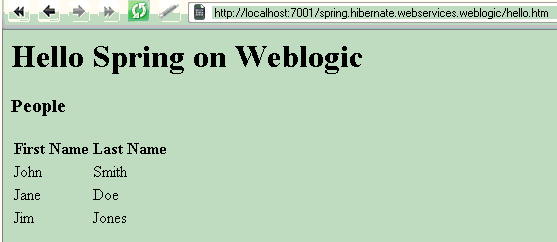
If we add another line to this script, re-run the create-database task and refresh the browser, the list in the browser should reflect the new name.

Setup a WebService


Now that our view is populated by a Spring-managed DAO that uses Hibernate to access our database, we are ready to add our Service endpoint.
Suppose we want to expose all the People in our database with a JAX-WS WebService call.
Suppose we also want to use the Spring Web Context to auto-wire the WebService with our existing DAO.
The interface for the WebService can have a single method that returns an array of People.


package spring.hibernate.webservices.weblogic.ws;
import spring.hibernate.webservices.weblogic.domain.Person;
public interface IGetPeople {
Person[] getPeople();
}


We can create an auto-wired implementation of this interface. This is the class that Spring will know about. To Spring, this class is just an auto-wired bean and not necessarily a WebService.


package spring.hibernate.webservices.weblogic.ws;

import java.util.Collection;
import org.springframework.beans.factory.annotation.Autowired;
import spring.hibernate.webservices.weblogic.dao.PersonDAO;
import spring.hibernate.webservices.weblogic.domain.Person;

public final class GetPeopleDelegate implements IGetPeople {

private final PersonDAO personDAO;

@Autowired
public GetPeopleDelegate(final PersonDAO personDAO) {
this.personDAO = personDAO;
}

public Person[] getPeople() {
final Collection<Person> people = personDAO.findAll();
return people.toArray(new Person[people.size()]);
}
}


We can annotate a Service Endpoint implementation of that interface as a WebService, as described in the WebLogic Web Services Guide. WebLogic does not know, nor does it need to know, that this class will delegate its work to a Spring-managed bean. Note that Weblogic must inject the javax.xml.ws.WebServiceContext, which is used to get the javax.servlet.ServletContext and from there to get the Spring bean. Also note the use of efficient, threadsafe lazy instantiation for retrieving the delegate from the Spring BeanFactory.


package spring.hibernate.webservices.weblogic.ws;

import java.util.concurrent.atomic.AtomicReference;
import javax.annotation.Resource;
import javax.jws.WebMethod;
import javax.jws.WebResult;
import javax.jws.WebService;
import javax.jws.soap.SOAPBinding;
import javax.servlet.ServletContext;
import javax.xml.ws.WebServiceContext;
import org.springframework.web.context.WebApplicationContext;
import org.springframework.web.context.support.WebApplicationContextUtils;
import spring.hibernate.webservices.weblogic.domain.Person;

@WebService(name = "GetPeople", targetNamespace = "http://spring.hibernate.webservices.weblogic", serviceName = "GetPeople")
@SOAPBinding(style = SOAPBinding.Style.DOCUMENT, use = SOAPBinding.Use.LITERAL, parameterStyle = SOAPBinding.ParameterStyle.WRAPPED)
public class GetPeople implements IGetPeople {

@Resource
private WebServiceContext context;
private final AtomicReference<IGetPeople> autoWiredDelegate;

public GetPeople() {
autoWiredDelegate = new AtomicReference<IGetPeople>();
}

@WebMethod(operationName = "getPeople")
@WebResult(name = "People", targetNamespace = "http://spring.hibernate.webservices.weblogic")
public Person[] getPeople() {
return getAutoWiredDelegate().getPeople();
}

private IGetPeople getAutoWiredDelegate() {
final IGetPeople existingValue = autoWiredDelegate.get();
if (existingValue != null) {
return existingValue;
}
final IGetPeople newValue = createAutoWiredDelegate();
if (autoWiredDelegate.compareAndSet(null, newValue)) {
return newValue;
}
return autoWiredDelegate.get();
}

private IGetPeople createAutoWiredDelegate() {
final ServletContext servletContext = (ServletContext) context.getMessageContext().get(
"javax.xml.ws.servlet.context");
final WebApplicationContext webApplicationContext = WebApplicationContextUtils
.getRequiredWebApplicationContext(servletContext);
return (IGetPeople) webApplicationContext.getAutowireCapableBeanFactory().getBean("getPeople");
}
}


This specific implementation is one of many possible. On the Weblogic 10.0 server, it is also possible to auto-wire a Weblogic WebService by extending org.springframework.web.context.support.SpringBeanAutowiringSupport (and as indicated in the javadoc for this class, "a typical usage of this base class is a JAX-WS endpoint class"). Unfortunately, this is not possible on Weblogic 10.3 because JAX-WS WebServices are instantiated in a different classloader than the classloader in which Spring is running. This does not appear to be the case for the earlier version on WebLogic.

We can add the managed delegate to the Spring configuration file.


<bean id="getPeople" class="spring.hibernate.webservices.weblogic.ws.GetPeopleDelegate" />


We must also declare the WebService in the web.xml file. Because we have already added the org.springframework.web.context.ContextLoaderListener, we can be sure that the WebApplicationContext has been initialized before the WebService is called the first time.


<servlet>
<servlet-name>GetPeoplehttp</servlet-name>
<servlet-class>spring.hibernate.webservices.weblogic.ws.GetPeople</servlet-class>
<load-on-startup>2</load-on-startup>
</servlet>
<servlet-mapping>
<servlet-name>GetPeoplehttp</servlet-name>
<url-pattern>/GetPeople</url-pattern>
</servlet-mapping>


Finally, we can setup our build.xml to generate the necessary JAX-WS WebService classes with the Weblogic jwsc task.


<taskdef name="jwsc" classname="weblogic.wsee.tools.anttasks.JwscTask">
<classpath refid="weblogic-classpath" />
</taskdef>

<target name="build-webservices-for-domain">
<jwsc srcdir="src" destdir="tmp/ws/gen" tempdir="tmp/ws/build" keeptempfiles="true">
<classpath refid="master-classpath" />
<classpath refid="weblogic-classpath" />
<module contextpath="${name}">
<jws type="JAXWS" file="spring/hibernate/webservices/weblogic/ws/GetPeople.java" />
</module>
</jwsc>
</target>

<target name="build-webservices">
<run-domain-task task.name="build-webservices-for-domain" />
<mkdir dir="${build.dir}/spring/hibernate/webservices/weblogic/ws/jaxws"/>
<copy todir="${build.dir}/spring/hibernate/webservices/weblogic/ws/jaxws" flatten="true">
<fileset dir="tmp/ws/build">
<include name="*/spring/hibernate/webservices/weblogic/ws/jaxws/*.class" />
</fileset>
</copy>
<delete>
<fileset dir="tmp">
<include name="**/*" />
</fileset>
<dirset dir="tmp">
<include name="**/*" />
</dirset>
</delete>
</target>


Note that if we would like to publish the wsdls, then we can easily set the module task's wsdlonly attribute to true and publish the generated wsdl and xsd before deleting all the temporary files.
Also note that we will want to set build-webservices as a dependency of the build-war task.

If we deploy the application to WebLogic, we can use a tool like soapUI to send a request and receive a response.


Testing the Application


Coming soon -- testing the application with JUnit, JMeter and STIQ . . . .